Maybe you've heard about CloudFlare but do not know how to install it for your website? In this article I will help you how to install CloudFlare details on website.
Before installation, it's also good if we understand what it is and the mechanism works okay anyway.
CloudFlare is what?
CloudFlare is an intermediary proxy service, so you should understand it simple. That is, instead of the domain name of the website you connect directly to the server via the IP address of the server, then CloudFlare will act to connect the intermediate, ie per visit, must be processed through CloudFlare prior to the server.
In the intermediate proxy, CloudFlare acts as a firewall to protect your website against SPAM, if you use its premium package, it will also help you detect malware and unauthorized access legal and even against Denial of Service (DDoS).
In addition, CloudFlare also be seen as an intermediate DNS service is very good and free CDN (Content Devilery Network) website to help you no matter where located server but it still has very good speed access to users. And most recently, CloudFlare also lets you use the protocol SSL / HTTPS completely free to increase the security of a website.
How to install CloudFlare
To install CloudFlare, your first visit https://www.cloudflare.com/sign-up to register a free account.
Once registration is complete, it will lead you to add pages to the website, where you enter the domain name to use CloudFlare, enter the domain name to the website and click Add.

Then it will take you to a page to manage DNS records, please click on the Edit Record A and edit the IP of the host IP you are using.

Repaired, then scroll down and press "I've added all the missing records, continue" to continue.
In the next page you will choose to use the service package, select the package Free offline.

Continue to press Continue and the last page, it will give you 2 nameservers, your task is to fix namesever domain to use 2 instead of CloudFlare's nameserver hosting provider.

Such use your domain name in Godaddy is involved in it, and pointing nameservers on two of CloudFlare address like this:
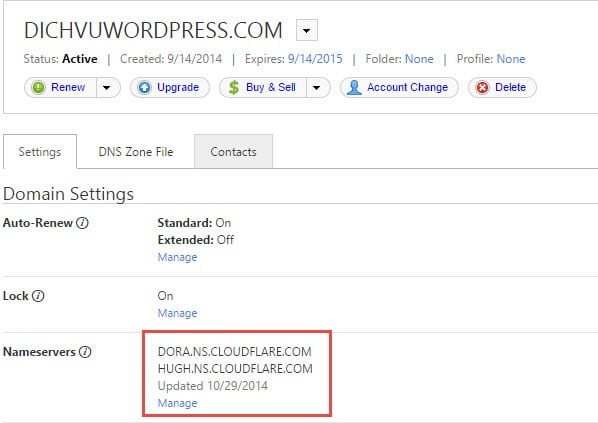
Change is on the CloudFlare finished and press the button ... I've updated my nameservers to complete the installation process. Your job now is to wait CloudFlare discovered your domain name has updated their DNS to start using.
Some Notes on the CloudFlare
Whenever you want to edit CSS or JavaScript file contents, you should enable Development Mode so that it does not cache static files, and so you see the change. This mode will be automatically removed after 3 hours.

In addition, you should also know that later if moving host, go to CloudFlare's IP exchange for a new host but do not touch anything until the correct nameservers of the domain name.
Epilogue
Above is a set of CloudFlare, basically, you just need to do is stop your website works fine then. If you want you can go to the settings of each domain in the CloudFlare to revise the custom for optimal speed and security, do not forget to check out the https://www.cloudflare.com/app-signup to use some apps built on CloudFlare such as Google Analytics integration such.
Không có nhận xét nào:
Đăng nhận xét